
1. Project Background
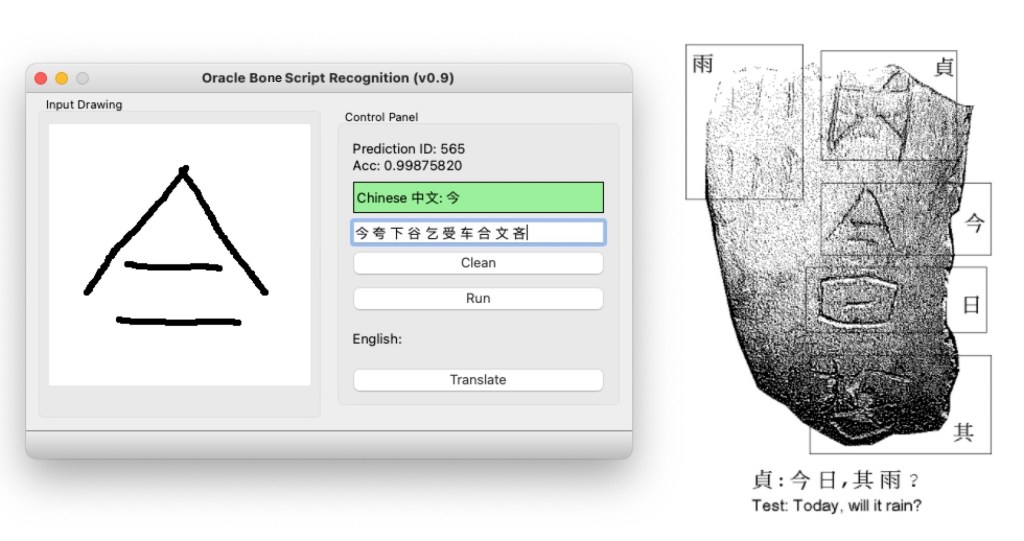
This blog demonstrates how to use Pytorch to build deep convolutional neural networks and use Qt to create the GUI with the pre-trained model. The final app runs like the figure below.
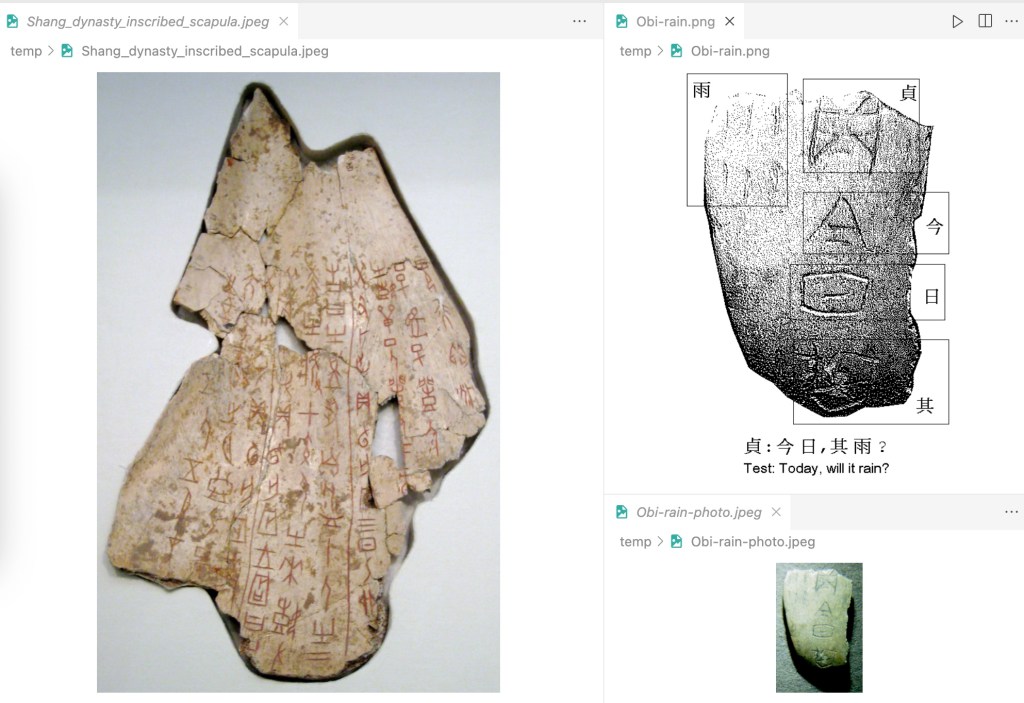
The five original oracle bone scripts in this sample image can be translated into modern Chinese characters as “贞,今日,其雨?” (Test: Today, will it rain?)
Please note that I am not an expert in the ancient Chinese language, and I think the translation may not be that accurate. But in the GUI, the user can draw the script in the input panel and then click the run button to get the top 10 Chinese characters ranked by probabilities. The highest result is presented with green background colour and 99.8% accuracy.
I will assume that readers have a basic understanding of the deep learning model, middle-level skills of python programming, and know a little about UX/UI design with Qt. There are awesome free tutorials on the internet or one could spend a few dollars to join online courses. I see no hurdles for people mastering these skills.
The following sections are arranged with the topics as follows. Explain the basic requirements for this project and then cover all the basic steps in detail:
- Init the project
- Create the Python Environment and Install the Dependencies
- Download the Raw Data and Preprocess the Data
- Build the Model with Pytorch
- Review the Image
- Test the Dataloader
- Build the Deep ConvNets Model
- Test the Model with Sample Images
- Test the Model with Qt-GUI
The source code can be found on my GitHub Repo: Oracle-Bone-Script-Recognition: Step by Step Demo; the README file contains all the basic steps to run on your local machine.
2. Basic Requirements
I used cookiecutter package to generate a skeleton of the project.
There are some opinions implicit in the project structure that has grown out of our experience with what works and what doesn’t when collaborating on data science projects. Some of the opinions are about workflows, and some of the opinions are about tools that make life easier.
- Data is immutable
- Notebooks are for exploration and communication (not for production)
- Analysis is a DAG (I used the ‘Makefile’ to create command modules of the workflow)
- Build from the environment up
Starting Requirements
- conda 4.12.0
- Python 3.7, 3.8 I would suggest using Anaconda for the installation of Python. Or you can just install the miniconda package, which saves a lot of space on your hard drive
3. Tutorial Step by Step
Step 1: Init the project
Use ‘git’ command to clone the project from Github.
cd PROJECT_DIR
git clone https://github.com/cuicaihao/deep-learning-for-oracle-bone-script-recognition
# or
# gh repo clone cuicaihao/deep-learning-for-oracle-bone-script-recognition
Check the project structure.
cd deep-learning-for-oracle-bone-script-recognition
ls -l
# or
# tree -h
You will see a similar structure as the one shown in the end. Meanwhile, you could open the ‘Makefile’ to see the raw commands of the workflow.
Step 2: Create the Python Environment and Install the Dependencies
The default setting is to create a virtual environment with Python 3.8.
make create_environment
Then, we activate the virtual environment.
conda activate oracle-bone-script-recognition
Then, we install the dependencies.
make requirements
The details of the dependencies are listed in the ‘requirements.txt’ file.
Step 3: Download the Raw Data and Preprocess the Data
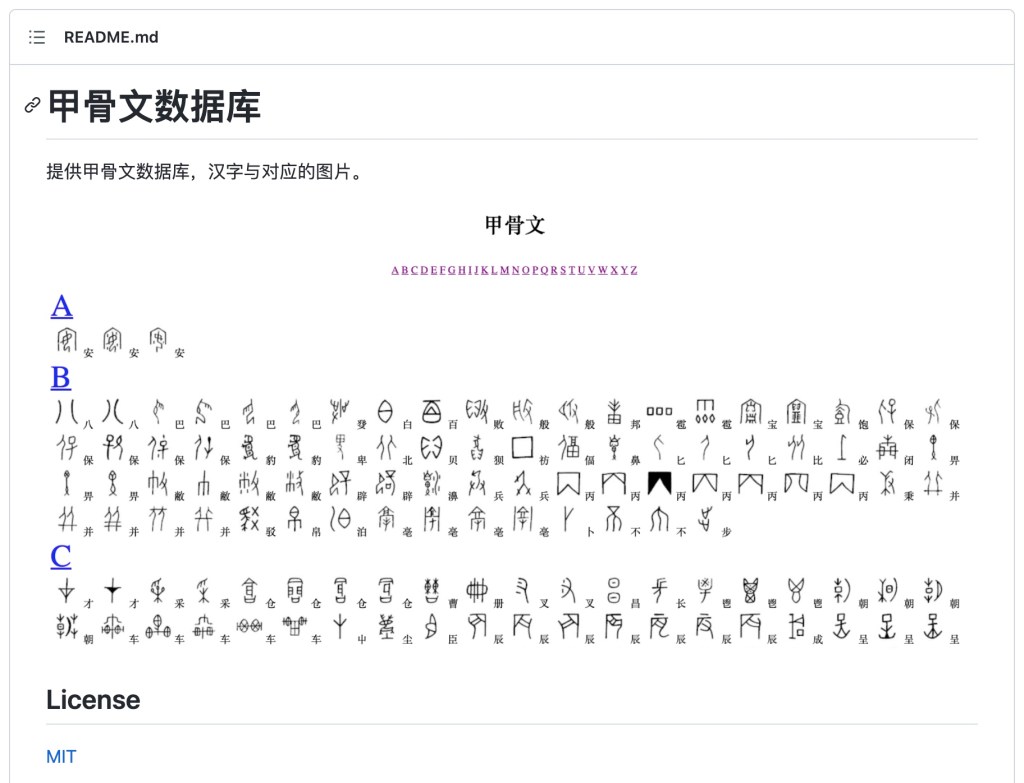
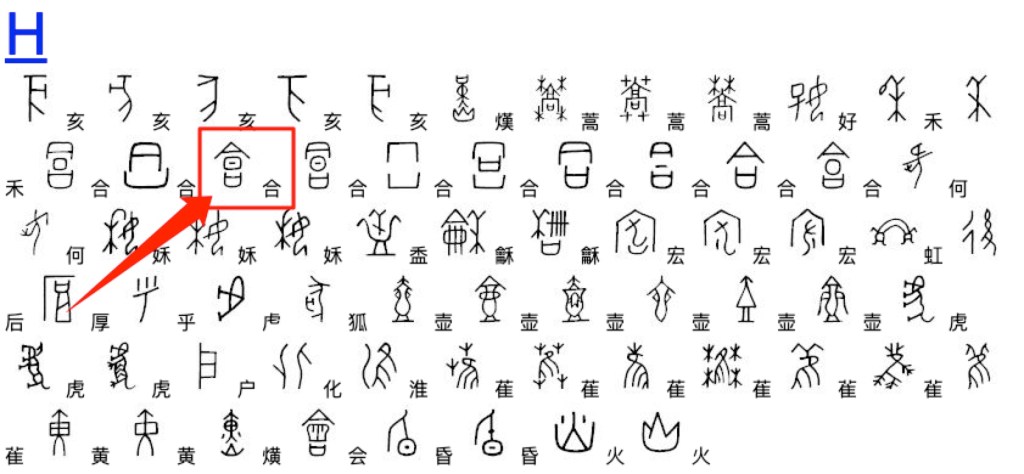
This first challenge is to find a data set with the oracle bone scripts; I found this website 甲骨文 and its GitHub Repo which provided all the script images and image-to-label database I need. The image folder contains 1602 images, and the image name to Chinese character (key-value) pairs are stored in JSON, SQL and DB format, making it the perfect data set for our project startup.
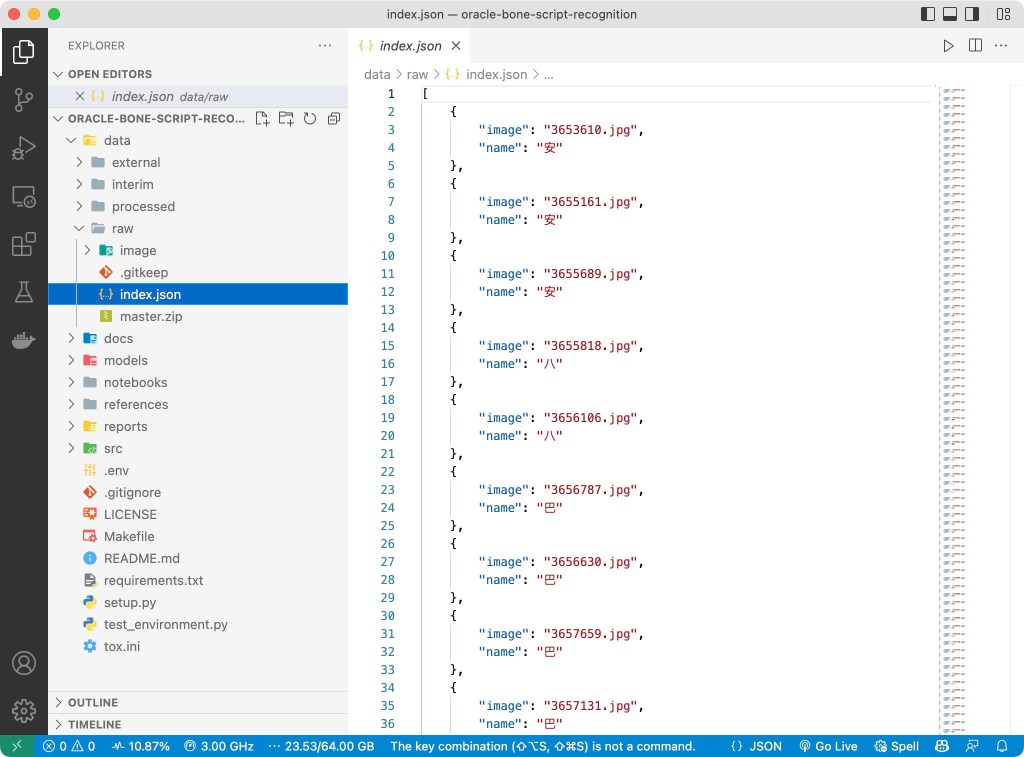
we can download the raw data of the images and database of the oracle bone script. Then we will download the raw data and preprocess the data in the project data/raw directory.
make download_data
The basic step is to download repository, unzip the repo, and then make a copy of the images and database (JSON) file to the project data/raw directory.
Then, we preprocess the data to create a table (CSV file) for model development.
make create_dataset
The source code is located at src/data/make_dataset.py. The make command will provide the input arguments to this script to create two tables (CSV file) in the project data/processed directory.
Step 4: Build the Model with Pytorch
This section is about model development.
4.1 Review Image and DataLoader
Before building the model, we need to review the image and data loader.
make image_review
This step will generate a series of images of the oracle bone script image sample to highlight the features of the images, such as colour, height, and width.
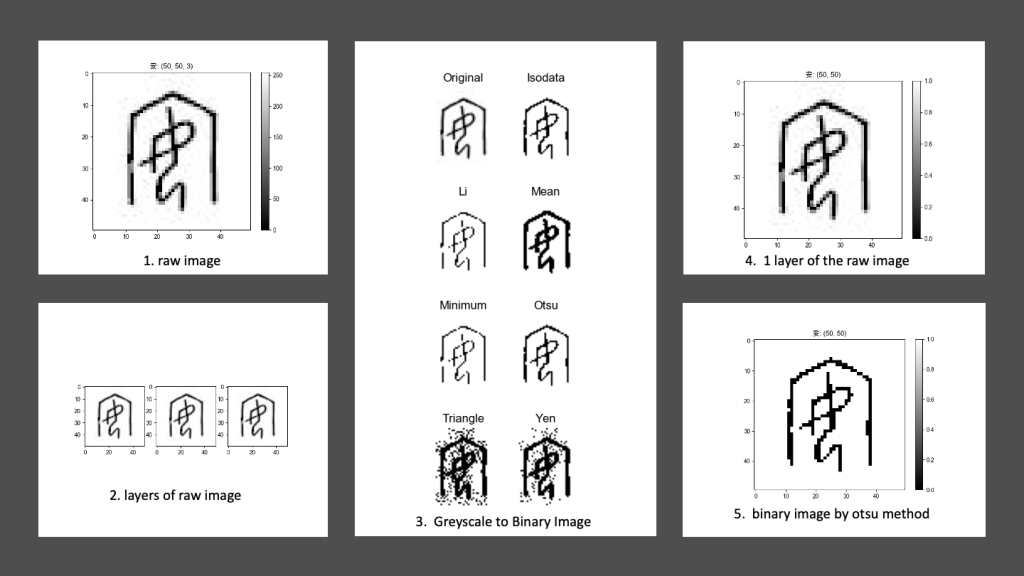
Besides, we show the results of different binarization methods of the original greyscale image with the tool provided by the scikit-image package.
The source code is located at src/visualization/visualize.py.
4.2 Test the DataLoader
We can still test the Dataloader with the command.
make test_dataloader
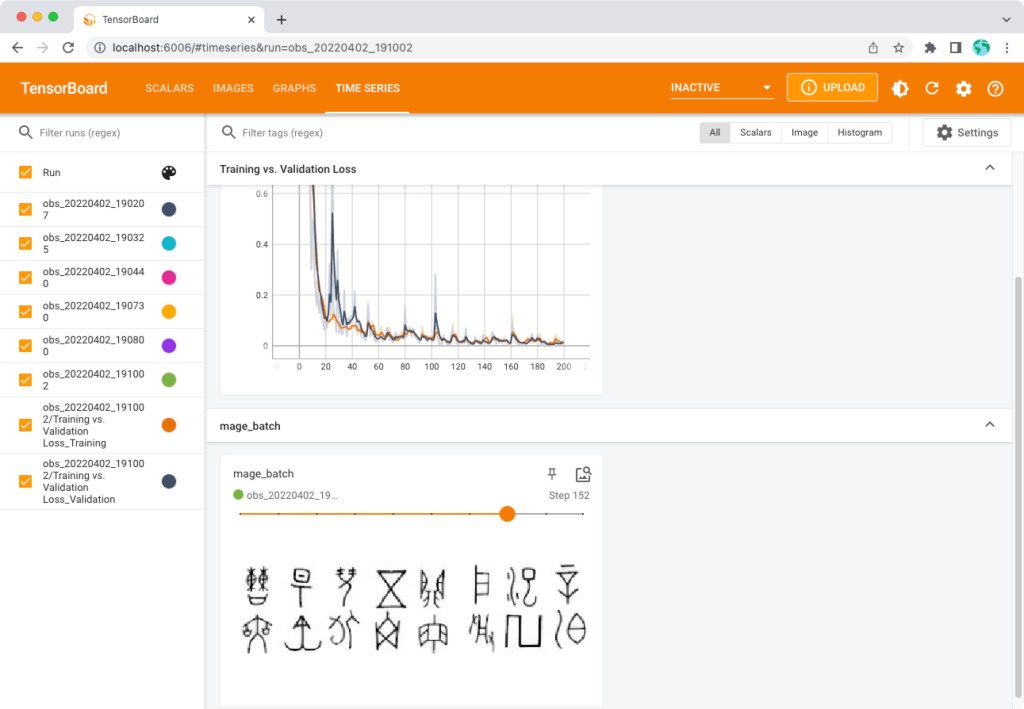
This will generate an 8×8 grid image of the oracle bone script image sample. The source code is located at src/data/make_dataloader.py.
In the image below, it generates a batch of 64 images with its label(Chinese characters) on the top-left corner.

4.3 Build the Deep Convolutional Neural Networks Model
Now we can build the model. The source code is located at src/models/train_model.py. This command will generate the model and the training process records at models/.
make train_model
(Optional) One can monitor the process by using the tensorboard command.
# Open another terminal
tensorboard --logdir=models/runs
Then open the link: http://localhost:6006/ to monitor the training and validation losses, see the training batch images, and see the model graph.


After the training process, there is one model file named model_best in the models/ directory.
4.4 Test the Model with Sample Image
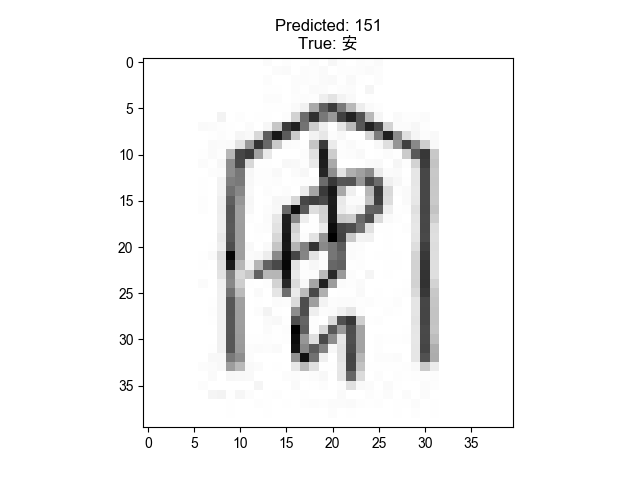
The pre-trained model is located at models/model_best. We can test the model with the sample image. I used the image (3653610.jpg) of the oracle bone script dataset in the Makefile test_model scripts, readers can change it to other images.
make test_model
# ...
# Chinese Character Label = 安
#      label name  count       prob
# 151    151    安      3 1.00000000
# 306    306    富      2 0.01444918
# 357    357    因      2 0.00002721
# 380    380    家      2 0.00001558
# 43      43    宜      5 0.00001120
# 586    586    会      1 0.00000136
# 311    311    膏      2 0.00000134
# 5        5    执      9 0.00000031
# 354    354    鲧      2 0.00000026
# 706    706    室      1 0.00000011
The command will generate a sample figure with a predicted label on the top and a table with the top 10 predicted labels sorted by the probability.
Step 5: Test the Model with Qt-GUI
Now, we have the model, we can test the model with the Qt-GUI. I used Qt Designer to create the UI file at src/ui/obs_gui.ui. Then, use the pyside6-uic command to get the Python code from the UI file `pyside6-uic src/ui/obs_gui.ui -o src/ui/obs_gui.py.
Activate the GUI by
python gui.py
# or
# make test_gui

The GUI contains an input drawing window for the user to scratch the oracle bone script as an image.
After the user finishes the drawing and clicks the RUN button. The input image is converted to a tensor (np.array) and fed into the model. The model will predict the label of the input image with probability which is shown on the top Control Panel of the GUI.
- Text Label 1: Show the Chinese character label of the input image ID and the Prediction Probability. If the Acc > 0.5, the label background colour is green; if the Acc < 0.0001, the label background colour is red. Otherwise, the label background colour is yellow.
- Test Label 2: Show the top 10 predicted labels sorted by the probability.
- Clean Button: Clean the input image.
- Run Button: Run the model with the input image.
- Translate Button: (Optional) Translate the Chinese character label to English. I did not find a good Translation service for a single character, so I left this park for future development or for the readers to think about it.
4 Summary
This repository is inspired by the most recent DeepMind’s work Predicting the past with Ithaca, I did not dig into the details of the work due to limited resources.
I think the work is very interesting, and I want to share my experience with the readers by trying a different language like Oracle Bone Scripts. It is also a good starter example for me to revisit the PyTorch deep learning packages and the qt-gui toolboxes.
I will be very grateful if you can share your experience with more readers. If you like this repository, please upvote/star it.
Conclusion
I made a formal statement on my GitHub on the first day of 2022, claiming that I would create 10 blogs on technology, but I got flattened by daily business and other work. But be a man of his word, I made my time to serve the community. Here comes the first one.
If you find the repository useful, please consider donating to the Standford Rural Area Education Program (https://sccei.fsi.stanford.edu/reap/): Policy change and research to help China’s invisible poor.
Reference
- Cookiecutter Data Science
- PyTorch Tutorial
- Qt for Python
- GitHub Chinese-Traditional-Culture/JiaGuWen
- Website of the Oracle Bone Script Index
-END-
